Thursday, April 4, 2013

Making a Rosemary Topiary ~ And a Little Road Trip


There is something about Rosemary, that is so darn special.  I found out by accident that even the little plants like these bought in the grocery stores can produce the sweetest little blue delicate flowers if kept cool, moist, & Summered out on the porch.  And red skinned potatoes take on an air of tasty brilliance with a bit sprinkled on them for the oven with basil.

I've had my eye on Topiaries and would like to make these little two plants above into a starter topiary.  Pinterest lead me to a great looking site to get me on track & I am sharing it with you: http://www.bhg.com/crafts/nature/topiaries/make-your-own-topiary/  

Even the faux topiaries are coming into view as great window decorations.  Covering the base in burlap or old quilt compliments the bright green foliage.


 Here's another great love, and when I find them, I like to photograph 'em!  Especially well done and looking like it just stepped out of circa 1830 ~ this quaint little log home in Smithville, Ohio, is a favorite!  Look at the details!


Wide chinking and beautifully well done. Things were in small scale back then, even the lower door knob.


Love the wide hewn weathered boards and captured look of old!

The little peep hole in the privy out back is as interested as it is adorable! 

And the moss covered stone stepping, and the weathered vine wind blocking additions are sweet as sugar!
 
.....Just a little road trip into the past & back :)....


Adding a few of the artist's primitive dolls that are up for adoption at our Brother's Antique Mall Location, in Medina Ohio. ~
 

And we also carry resale designer purses at an interesting cost ~ here are just a few !

Always,
Peace & Happiness,
Kathie


Tuesday, April 2, 2013

Finally, Back to Blogging! ~

 It's been a long -- time Country Heart ~ Friends!

I haven't listed anything for sale on my dear little sweet blog in so long, I can't remember.  After setting up a picture trail  https://www.picturetrail.com/mycountryheart  and two facebook pages  https://www.facebook.com/mycountryheart  and presently relocating My Country Heart, our 9 room farmhouse shop, from our Copley Road, address, out to the new location: Brother's Antique Mall, in Medina, Ohio - whew - the work! (and fun!) - Ask the Chairman - thank you Mr. Givens!

  And by the way, join us on Facebook & right here on this little blog!

Thought I would take a breath and share a little photo shoot and birds eye view of the new location, which is open 7 days and sports an interesting to come, Christmas Open House and two absolutely wonderful Antique Flea Markets a year....the old fashioned kind that you love NOT to miss!  If you sampled just one of the Christmas Gatherings ~ you would never want to miss another! Not to mention the goodies brought in by all the dealers!


We are known at Brother's as HICKORY HOLLOW PRIMITIVES By Kathie ~ & My Country Heart,  you can find our two large spots in the back of the large building by the above sign over the window & the salmony colored backdrop. 

 
Now, I can finally have the "freed-up time to" hand-do designs and dolls with old textiles - one of my hearts' desires.....along with many other hand done stuff!  These old quilt pin keeps, are one of the new items in this old chunky basket that are up for your consideration ~ $6.50.  We can mail to your door.  This was filled, but still a great selection!
 

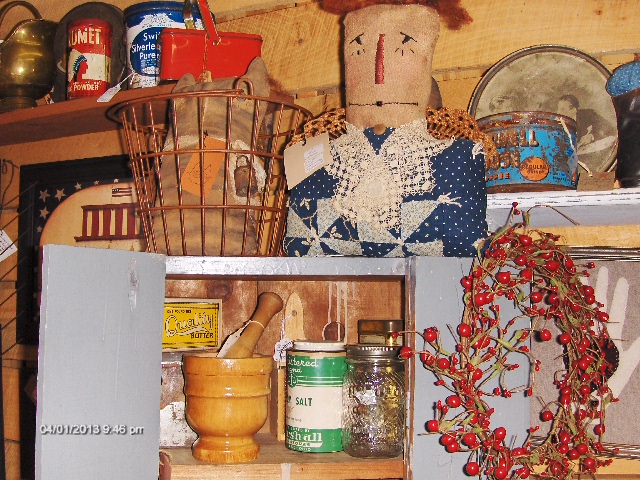
Annie, pin keep, in the Civil War blue bodice & old lace is quite a favorite with me, I love to make Annies!  She is up for sale $45 and the gray cupboard just sold today, whoops sorry ~ but old tins and such are available!


Two of these are available, hand punched Irvin's tin lighting ~ so primitive and quaint....along with the old picket fence in the background which is a huge flower box made from old wood facing.  Email me for more information on these  Kathiegivens@msn.com
 
 
Neat, heavy old feedsack, made into fresh and fluffy pillows.  I always like to mention how great they look on the porch!  Always 100% new fiberfill - filled (with an Ohioan stuffing license for 2013!)


Lots of old photographs to take a short trip into the past.  Come in and browse!  We mail them too!


And last but not least, presenting... my beautiful Pink Hyacinth, which I bought for myself....that bloomed on Easter morning...no less!  You would not believe how my entire kitchen was misted with the scent of this most delightful plant!  This year,  I found it at the thrift store for only $4.99 & worth every penny.  It has three big bulbs, which I always wait until the stems dry out and plant the bulbs by the front door for next Spring ~ what a simply great living memory to enjoy, of all the Easter morning's of the past and the flowers we use to bring to grandma and mom's house!   

Peace and Blessings!
~Kathie

Wednesday, January 30, 2013

LITTLE WARTY PUMPKIN GARLAND ~ Primitive Tutorial!


This year, I purchased several neat pumpkins from  Lori - a dealer friend at Brother's Antiques Mall, in Medina, Ohio at the annual Flea Market in September (don't miss it this year!).  She had a bunch of neat gourds that her daughter grew that I have never seen before!  And this beauty, that I will call - a  Warty Pumpkin /Gourd!  It's pretty big and beautifully colored with a nice thick stem.  But the most interesting part about this sweet little pumpkin is the fact that its skin is thin and dried hard all by itself just sitting outside!!!  As you can see I just turned it over and started cracking off these wonderful pieces I gathered & put in a baggy.  I did lay them out on  pieces of cardboard right under a ceiling register for a day.  And they dried crisp and ready to string!  And look at all those warts!  Perfect for stringing a garland to enjoy inside all year!
 
Here is one of several pumpkins I have setting out on a railroad tie for the deer, they make a little hole in the side and finish up all the seeds.


Here is an up close and personal look at this wonderful already dried out pumpkin.  And it looks just like the day I bought it home.  Just love it!  This resembles in its appearance, the peanut pumpkin, but the peanut pumpkin is all mushy and didn't turn out like this one!
 
 
Here's what the peanut pumpkin looks like!  Mush!  Stem is missing - already gathered that!  It was dried and ready for harvest.  Birds love to dig in for seeds too :-)


Make sure you save the pumpkin stems of all your pumpkins after the Fall Season - they look so primitive on handmade pumpkins just glued right on!  And they dry up so nice!
 
 
Here is Rusty following me all around the yard and is watching me gathering the warty pumpkin :)


Here is what this beautiful pumpkin gourd looks like up close.  This is January and I purchased last September - it has dried and the outside has become hard and crusty.  You can just break off all the neat outside layer in small pieces!  It's fun to scout out the back yard, we live in a hollow with a grove of shaggy bark hickory trees and pines which makes lots of dried stuff to gathers after the snow has melted. 
 
 
Punch a little hole in all what you will need of the pieces and pick out the most interesting after they have dried a little.  This is the best material for garland that I have ever found!


If you have ever made a sweet potato garland - this will be much easier to poke a hole through.  Little effort to prepare the punch!  No more of those!  Easier on the fingers, too!


Lima bean pods, can be very gently punched for a nice little hole to string on the raffia that I used for this one. 
 
 
Here are my beautiful chunky little lima beans all dried and ready for punching.   To dry lima pods with the beans still in them is very easy.  I lay them out on cardboard with no ends touching and they look fantastic in a week or so.  Usually you have to go to a farmer's market to get these.


Look at all these beautiful and crusty pieces that are already punched for stringing, it's most easiest to punch through the warty bumps!
 
 
Add all the neat pieces you have broken and punched a hole in and tie off each end for hanging......in this garland I have used raffia, usually I use rusty wire - it lasts forever.  But a nice piece of the raffia is a bit more flexible.  You'll have to use a nice sturdy piece that the end won't fray.  And don't forget to make a loop on each side for hanging.


And here is the finished product!  It fits across a cupboard very nicely or across a small window.  You can add whatever dried stuff you have on hand.   Black walnuts that the squirrels have chewed out both sides are also a favorite!  There you have it, enjoy!  Thanks for stopping by, let me know if you have any questions    ©   ~KATHIE
 
 
Please be kind enough to give me credit if you remake this item, but you cannot copy this tutorial in any form ©  or photos ©

Sunday, June 3, 2012

Visit the new Picture Trail website ~ !


We are just adding new stuff & finishing touches to our new Picture Trail website ~ come and visit, lots to see!!

http://www.picturetrail.com/mycountryheart


~Kathie

Wednesday, March 21, 2012

Angel of the Garden......

This little primitive doll has an interesting little olde feedsack dress that ties at the neck ~ she has a burlap sack of drieds and has her signature heart on her hand.  She is one of a kind and has beautiful flax hair & old button eyes.  $47.00 plus postage....send me an email if you are interested in owning her... kathiegivens@roadrunner.com   Thank you for looking!

~Kathie

Missy Primitive ~ Agetha, Up For Adoption!

Here she is with her little watermelon & old quilt square apron, ready for the Summer fun.  Little hand wrought Agetha is ready for adoption.  She is just so darn cute, painted & distresses, and loves everything primitive. ~ she also loves to sew,  is one of a kind, with my signature heart on her hand,  & sweet as sugar.  You will love her vintage little dress!.....$47.00 plus postage ---send me an email & I will send her to your door:)  kathiegivens@roadrunner.com ~ Thank you! SOLD ~

Friday, October 14, 2011

Cinnamon Pumpkin ~Tutorial ~ FREEBIE for Blogger/Facebook Customer & Friends

Hi Everyone! ©

Thought I would take a minute to share with you, my classic "Little Cinnamon Pumpkin Recipe" and Picture Tutorial! Hope you enjoy this "How to" in the Fall and make them every Halloween and Thanksgiving. If Halloween and Pumpkins are your favorite, like they are mine, you will really enjoy making these little beauties that smell so wonderful!

Please do bring me some links and likes, & do give me your credits- Many thanks & enjoy!


Ingredients & what you will need:

Medium bowl & spoon
Tin Cookie Sheet
Pastry paper roll
2/3 cup applesauce (least expensive you can find)
1 cup ground cinnamon ( a little more if needed)
2 tablespoons white glue (Elmer's or whatever white glue you have)
Nutmeg 1 t. or apple pie spices
Little cut, sticks or cut grapevine is fine, not too big
Blunt knife & scissors

Mix ground cinnamon, applesauce, glue, & nutmeg - all together to a clay-like kinda of dry consistency in a bowl, see photo below & add more cinnamon if needed. Mmmm, smells good & lasts along time! (I like the mix a bit dry so it takes a minimal time to dry out.)


They turn out a beautiful orange/brown color you will love. You can cut the sticks before you make them & on a slant at the top, with a scissors. Grape vine is nice because it has the curly cues.


Here is what you need...


Grab a hunk in the size you would like your little pumpkin to be & roll in your hands to get all the cracks out and smooth. (Just like making mud balls :) You might want to sprinkle cinnamon in your hands...


With the blunt edge of a knife like the one below or a butter knife, gently just lay the knife in the top of the pumpkin & "lay it down" to the bottom" to make your crease, making sure all your lines meet and "not cross at the bottom" I find it looks a lot better than dragging the knife. Six lines on each one just about looks good.


I like to press the pumpkin down a little but careful---not "too much". I sprinkled a little powdered cinnamon on top of these before they go into an oven -- but in hindsight, I think I like them without the sprinkles....


Place them on a section of pastry paper the full size of your cookie tin and in a low temp oven of 150 degrees. Each batch will be different--- some I leave in longer than others, watch them close, about 45 minutes will cook them fine then I place them out to air dry on the tray & keep turning them over for up to 3 days. Trial an error and see what works best for you. It also depends on how big they are....


Don't forget before placing in oven to now place the little stems/sticks in the top. Be careful not to "press thru" This is the crowning glory and they now look just like little pumpkins. I have one pumpkin that has lasted 5 years and still smells wonderful & looks great!


Here they are.....all dried and beautiful. Each one will look like that cute little pumpkin you have always dreamed of to place with your craft project or arrangements or just in a bowl!


Feel free to make our shared tutorial, BUT YOU MAY NOT COPY THIS TUTORIAL AS YOUR OWN WITHOUT MY PERMISSION. ©   AND PHOTOS ©


~Kathie Givens ~


My Country Heart, Copley Ohio~


Saturday, June 11, 2011

Primitive Sunflower ~ FREEBIE Tutorial!!!!


I just love to come across a neat freebie pattern that gives me a good idea ~ so, hopefully, today, here is one for you.

This big sunflower is hand sewn together, and stuffed with raffia, or if you can find the primitive green stiff grass. Then a wood slat, as a stem. ( A fat tree stick would also work very well.) I love it weathered and about 2' tall and 1 1/2" wide. Then you can wire or glue a holder on the reverse side to hang on your door, or make a few to stick in a crock.


Use a big dinner plate and a smaller one as your circle guide. Cut two round bigger gold canvas cloth circles, then one smaller wool felt circles. Use big stitches and stitch thru all three layers of fabric. It goes fast.


Then cut thru all around the outside for petals, almost to the brown center in both layers of the gold cloth.


You can't go wrong on this pattern. Come into the shop and you can see them made up, or send me an email if you would like to purchase.


Turn over and cut a sliver thru only one layer of the flower backing. This is where you will stuff with raffia, then glue a wood slat in as the flower stem & tie a strip of green homespun around it or wool. I don't have one here to show you, but stick it in almost to the top & apply glue to the stick first. Do this, after you have stained & dried with your favorite coffee or tea recipe....


I always use one of these foam brushes to apply the darkening. The petals will curl up nice and look neat & prim when dried. I use cardboard cut ups to dry any item I have "antiqued" they work nicely and keep things clean. You can carry and stack them real easy ~ and reusing them are a dream.


And there you are, enjoy!


(Thank you for giving me credit if you use this pattern)


~ Kathie