~No Baking and They Do Not Curl Up! ~ ©
By Kathie Givens

Hello Everyone one!
It's been ages since I posted anything! And it's time to get right back in the saddle... Hickory Hollow is a part of My Country Heart and we are now located in Brother's Antique Mall in Medina, Ohio. We moved out of our 8 room Farmhouse in Copley, Ohio. Watch for lots more tutorials to come and follow us on our two Face Book pages :-)
Had a very bad & rude experience with one of my tutorials being copied right down to the same-like photos! But with that said and done....I post my tutorials for you to learn and make items for free. It's nice if you would mention where you learned and you can sell them if you want, but please DO NOT copy my tutorial work and print it as your own work.
Primitive tags tutorials are many on the Net, with lot of simalarities, here, but this is how I do mine. After making so many tags over the years, I do believe I like this one the best. It works very easy and they DO NOT CURL UP after applying the tint & no baking is required what-so-ever! So here we go ~ hope you learn a lot here, it's a freebie! Stop back and visit soon.
Here is exactly what you will need for this project. Gloves and Avery Shipping tags. Out of all the tags I have used, these are the best ones. String is cotton and antiques very well. It may not work on any other tags you have. I only use this brand of tags.

I love to work right on top of my washer and dryer! Just the right height and perfect lighting! And I have a nice CD play nearby!
I gather several card board box pieces. One to work on and a few to set the tags on after they are completed. After the card board gets damp, it provides a great marking on each tag, just from sponging it on each one from the indention of the lines on the cardboard. This does not happen until the cardboard gets saturated.

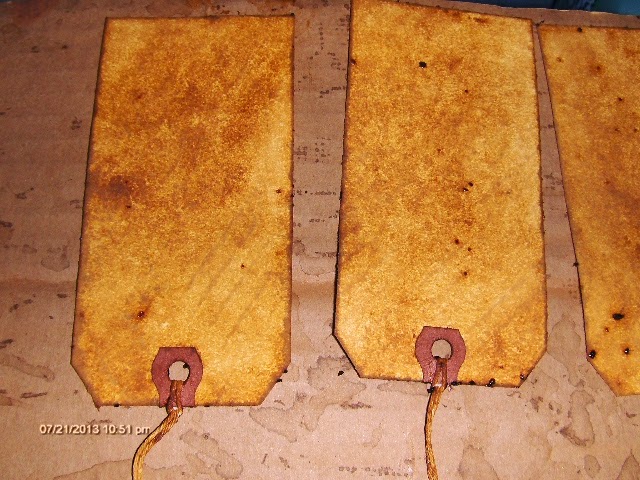
Here's a few completed tags so you can see the great patina the coffee provides and the smell is Heavenly! No other procedure that I have seen, provides this highly textured and deeply antiqued card.
You will need an empty coffee jar, instant coffee, and dollar store vanilla. I save all the excess perked coffee in the frig. in this coffee jar and when I start this project I simply pour the entire container of vanilla in this perked jar of old coffee from the frig and shake.

I only use a piece of cut off sponge that I had moistened and dunk into the perked coffee and vanilla mixture. Below are the tags before being stained.

And here below is the difference of the finished tag and unstained tags....

So here is the secret of obtaining the above deep and dark textured look of these Avery tags. After dabbing with wet sponge and not forgetting the string on both sides. While still wet.....

Open your instant coffee jar and pour a small amount of instant coffee onto wet card just as pictured.

Then rub with the palm of your hand in the gritty instant coffee in a circular motion all over the card. You will get results instantly. Rub entire card - do not leave any un-rubbed coffee on card or it will get sticky and they will stick together when dried. Then turn over and rub in the reverse side just like the front. It's like magic with these Avery tags. They come out the best old looking color I have seen yet!!!! :-) String too!!!

Don't forget to use the palm of your hand it grinds it in better than any other technique!

Then place on cardboard to dry. Notice they lay down flat. NO Curling!!!!!! Leave overnight to dry. They are perfect in the morning, still flat with outstanding color!!! Looks like they are a century old!

I use this little trusty sponge for other artwork too, just rinse and & place on the cardboard to dry!

Avery tags number 11555 can be purchased at any office supply store or if you are lucky enough to find a box at tag sales with 500 in the box!


You can dab your gloves with the coffee mixture while you are working to get the coffee globs off from your gloves. It' nice and dark.

Here is where the nice card board lines that come through the wet tags and wet surface come into play. Awesome added luck! It's like an added rubbing of a textured surface!


A suggestion to decorate......I collect and adore all different types of alphabet stamps. They look so neat with works of wisdom stamped out on these tags along with a medium small star punched out at the bottom. You can go crazy with neat and different ideas with tags. :-)
